Jupyter Notebook/Lab
Starting a Jupyter session on the terrabyte portal
A Jupyter Notebook/Lab can be started from the terrabyte Portal.

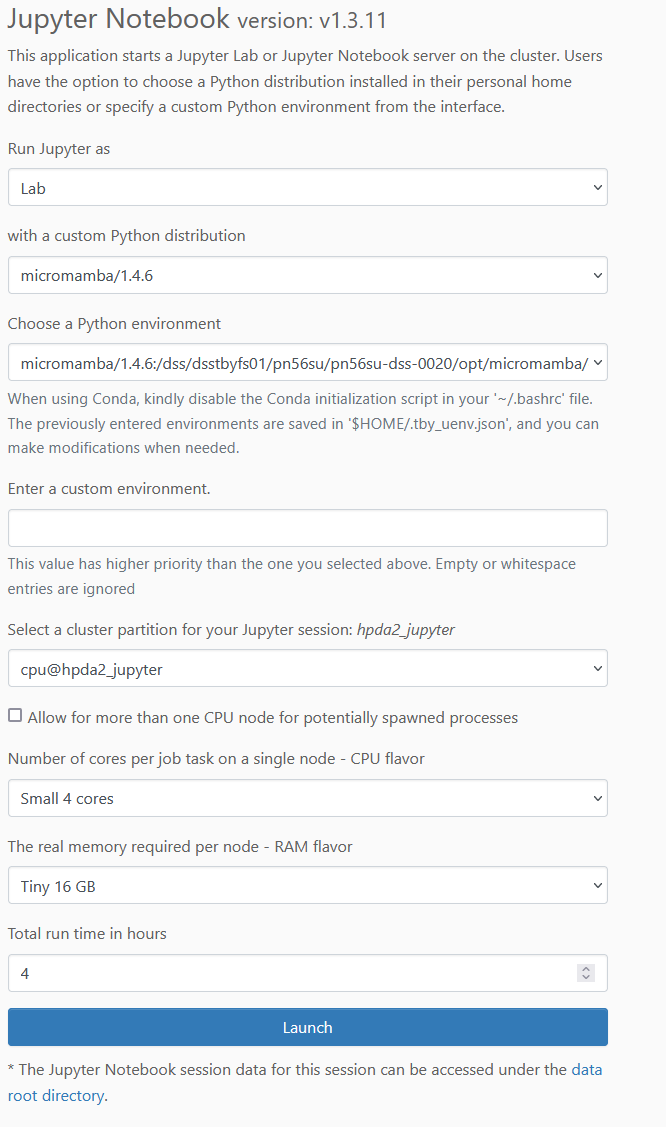
Run Jupyter as: Launch a single Jupyter Notebook or a Lab Session including File Browser and Terminal window.
with a custom Python distribution: Choose the environment to start your Jupyter instance in:
-
Anaconda: Base Conda environment including a small selection of relevant python packages like dask, pystac
-
Micromamba: Micromamba based environment including a small selection of relevant python packages like dask, pystac
-
Charliecloud: Run JupyterLab inside a Charliecloud container environment. This allows to transfer existing containerized environments to the terrabyte system. There is no default image here; the user specifies an individual container image to work in.
If you are creating new environments, we highly recommend using micromamba instead of conda. Micromamba is pretty much a drop-in replacement (substitute conda with micromamba in prompts) and a lot faster when installing more complex environments compared to conda. It uses the conda-forge repository so all conda-forge packages are available.
The optional field Choose a Python environment offers a drop down list of previously (successfully) executed custom environments (specified via the Enter a custom environment field). The list content is dependent on your choice in the field with a custom Python distribution and will only offer environments of that type. You can manually add/remove environments from this list by editing the hidden file .tby_uenv.json in you Home Folder.
The optional Field Enter a custom environment lets you manually enter the name (or path) of your personal conda/micromamba environment you previously created in your home folder (or in a DSS container you have access to). Please take care that at a minimum the Jupyter package is installed in your environment to be able to start it successfully. Find an example here on how to create your environment from inside Jupyter.
In the case of Charliecloud containers, please provide the path to your container image (optimally in the sqfs format).
Once a custom environment has been launched succesfully (Jupyter could be started), the Portal will offer your custom environment via the Choose a Python environment dropdown menu.
The optional field Enter a custom environment is dependent on your choice in with a custom Python distribution. So for example, if you selected Micromamba there, you can only specify a Micromamba environment here and not the path to a Charliecloud image!
In the field Cluster Partition, you can select on which cluster partition your Notebook will be started. The pre-selected cpu@hpda2_jupyter is a dedicated partition for interactive development. Therefore you will (most likely) always immediately get ressources on this partition. However, as a development partition you are restriced in how much ressources you can allocate.
You can further specify how many CPUs and memory your Notebook will need as well as how long your Notebook will be run.
Once all the settings done, click Launch to start your Notebook server.
If you have to wait for long times until your session gets launched, select a different cluster partition. hpda2_compute is usually a good choice.
You may check available cluster resources with sinfo on the login node.
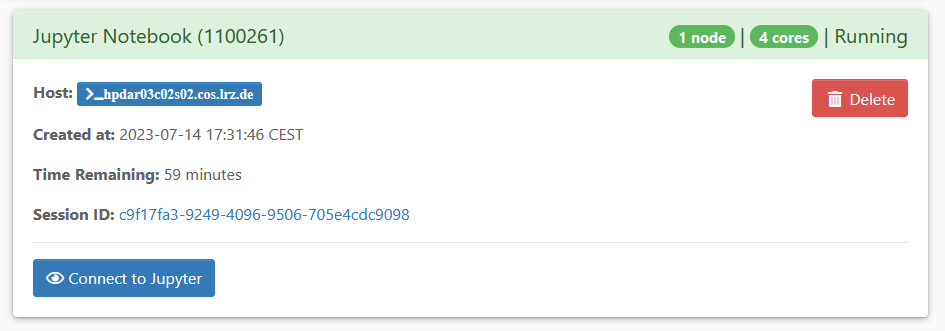
After the resources have been allocated, you will be able to click on Connect to Jupyter and log into your notebook.
If you ever encounter an issue with starting your Notebook, you may click on the Session ID String to check the output.log for reported errors. A frequent cause of trouble is misspelling of the custom environment.
You can close and resume the browser window of your Jupyter session anytime during your specified run time. Click on My Interactive Sessions in the upper menu bar of the portal and access your running Notebook again, by clicking on Connect to Jupyter.
In order to terminate the session before the run time ends, go to My Interactive Sessions, select the respective session and click on Delete.
Secondary web services from Jupyter
To access a secondary webserver running parallel to a JupyterLab
Session, make sure that the jupyter-server-proxy package is installed
in your environment or install it with
micromamba install jupyter-server-proxy. You have to restart your
JupyterLab session after installation, as it has to be loaded at
JupyterLab's start. Restarting the kernel is not sufficient!
The jupyter-server-proxy extension is already installed in the Micromamba and Conda base environments provided by the terrabyte team.
Example of how to access the dask diagnostic secondary web service
import os
import dask

host = os.getenv('host')
jl_port = os.getenv('port')

# create the URL to point to the jupyter-server-proxy
dask_url = f'https://portal.terrabyte.lrz.de/node/{host}/{jl_port}'+'/proxy/{port}/status'

# dask will insert the final port choosen by the Cluster at {port} when the cluster is started
dask.config.set({'distributed.dashboard.link': dask_url})
Similarily any other webservice you start on localhost is accessible via
the JupyterLab URL. So if your JupyterLab session is running on
https://portal.terrabyte.lrz.de/node/hpdar03c02s02.cos.lrz.de/45886/lab
and you start a webservice on port 8888 of localhost, you can reach it at
https://portal.terrabyte.lrz.de/node/hpdar03c02s02.cos.lrz.de/45886/lab/proxy/8888/
directly from the terrabyte Portal.